| U.S.
WWII K38 A Trailer Cable Splicer for Jeep |
 |
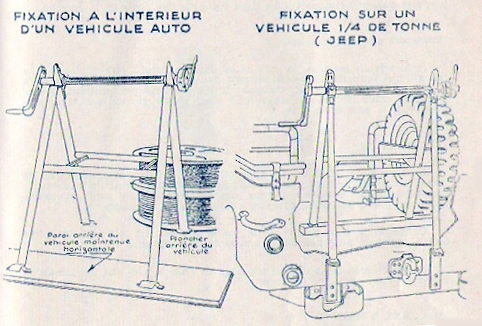
The Cable ReelAt this point, the directions really let you down. In spite of four photos-one color shot on the box and three poorly defined and reproduced black and white photos in the instructions, it is exceedingly difficult to determine how the rest of the resin pieces come together to create the cable reel support. There is a drawing, apparently taken from a tech manual, that only identifies some of the parts, but not how they come together. The cable reel is mounted in the RL-31 reel unit, a foldable framework which could be employed on the ground or mounted in two different ways on a jeep: suspended off the rear at a 45 degree angle, as in this kit, or straddling the back wall of the jeep, as in C.G.M.'s other kit (right illustration , below). The unit could also be mounted in another vehicle (left illustration) or set on the ground.
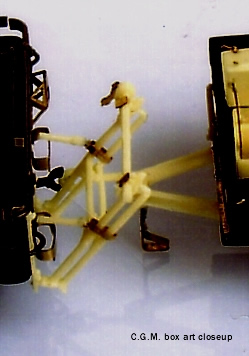
Only by enlarging the box art photo and adjusting the brightness and contrast was I able to get a better idea of just how the unit is supposed to come together. In its collapsed mode, you just need to glue the two frames together. The contact points at the top arch of the frame might need some sanding to get a more flush mating surface and a stronger bond.
To create the three reels, you are given a decent fret of photoetched parts and a piece of plastic tube that you are to cut for the reels. No measurements are given for the tube lengths, however. The instructions for the other kit do have measurements: 14mm for the reel that goes on the frame, and 6mm for the remaining two reels. Government Issue Collector's Guide by Henri-Paul Enjames says the larger reel was the DR-5, with a 1,800-yard capacity. Or the frame could mount two narrower DR-4 reels. In Howard Aran's article, he identifies the DR-4 as the wider reel; his restored example came from Normandy had holes in its side walls. Similarly, his research shows that the narrower reels (DR-5?) also had round holes in the sides. So it may that C.G.M. has a postwar version? It's up to you to find your own wire for the reels. The plastic tube provided by C.G.M. is pretty narrow, so if you want to represent a full reel, it might be worthwhile to use a thicker tube so you won't need to do a lot of wrapping. If you want reels with holes in them and resin "wire" inserts, they are available from Plus Model (Operator Reels, #085). The instructions show the RL-31 unit without the reel in place. Naturally, I wanted to load it on, and anticipated there would be problems when the completed unit was attached to the jeep, but this went surprisingly well. I used some slow-setting superglue to attach the footpads of the reel unit to the small shelves at the bottom of the brackets that are mounted on the jeep. I used faster-setting glue on the tailgate hangers. Somehow it all worked. Introduction |
 There
are two photoetch pieces that are supposed to be bent and wrapped around the legs
to keep them together; there are two resin pieces that then connect the p/e to
the rear of the trailer. I used some lead foil instead of the springy brass, making
sure the ends of the foil straps came together on the back side of the frame.
This ensured a smooth surface on the front side where the each of the resin tailgate
hangers would be superglued.
There
are two photoetch pieces that are supposed to be bent and wrapped around the legs
to keep them together; there are two resin pieces that then connect the p/e to
the rear of the trailer. I used some lead foil instead of the springy brass, making
sure the ends of the foil straps came together on the back side of the frame.
This ensured a smooth surface on the front side where the each of the resin tailgate
hangers would be superglued.  |
 |
 |
 |
 |
 |
 |
 |
 |
 |
 |
 |
|