|
U.S.
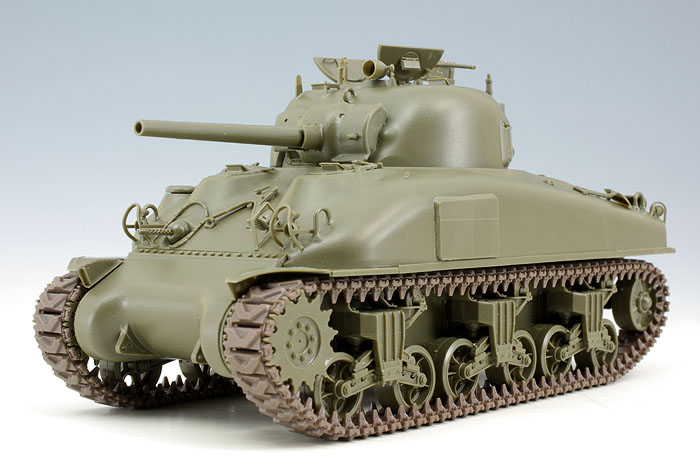
Medium Tank M4A1 Sherman (Late Production)
|
 |
|
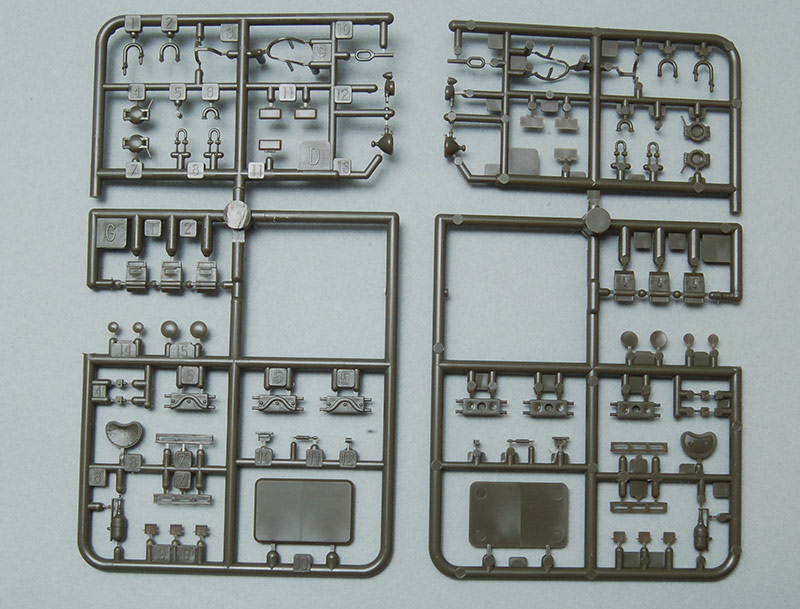
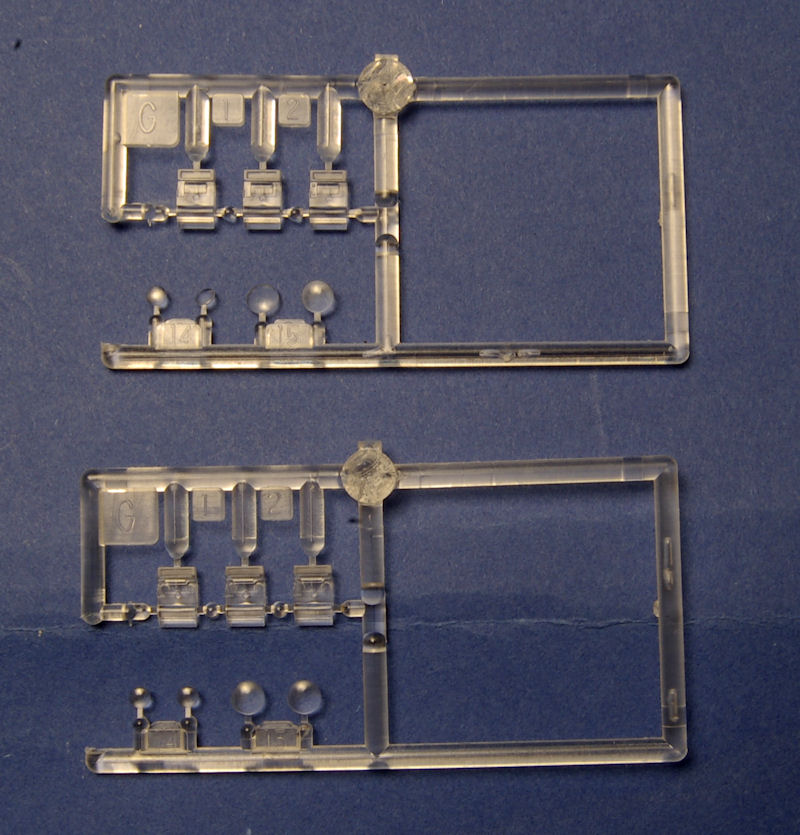
Tasca The M4A1 was the first Sherman production model to reach production and was supplied to the British to use in the battle of El Alamein. The first M4A1 produced had a side entry hatch, a riveted lower hull, direct vision ports in front of the driver and co-driver hatches, and bogies all from the M3 Lee production lineage. Two fixed forward firing 30 Cal machineguns in the glacis were quickly deleted from production as was the side entry hatch. "Michael" is a surviving M4A1 found in Bovington. By the time the British received their lot, the tank turret also lost the rotor sight. The British modified their Shermans to suit their needs based on their experience in Desert warfare. The US Army, Free French Forces, and USMC all used the M4A1 Mid Production variant. These tanks had received the heavy duty vertical volute suspension system (VVSS). The M4A1 production at Pressed Steel began with a riveted lower hull tub but this gave way to a welded tub. Both variants had an angled transition from the lower rear plate to the hull tub. Pacific Car and Lima had a rounded off transition. Changes during production included the addition of springs to the driver’s and bow gunner’s hatches, a pillow block to the VVSS return roller bracket, M34A1 mantlet and rotor shield, and additional appliqué armor to the upper hull sides and turret cheek. These last two are the most obvious. Other less notable changes during production include searchlight with mount, siren bracket, gun travel lock, simplified front mudguards and mounts (straight across as opposed to angled). The appliqué armor had some changes as well. It began with multi-piece flat sections, later on they were single sheets curved to the surface it would attach to, and last were the modified sand molds whereby the additional thickness offered by the appliqué was cast in. This version also made it into the large hatch hulls which changed the location of the ventilator and the rear angle of the upper hull plate. The KitThis is Tasca's fourth Sherman kit overall and second M4A1, it follows the release of their M4A1 "Mid" from a few months ago. There is not a lot that is different from the previous M4A1, this is a later version. Only one new sprue, sprue "L", a new set of T-48 rubber chevron tracks, and new marking schemes are included. Refer to Paul A. Owen's review of Tasca's U.S. Medium Tank M4A1 Sherman (Mid Production) for more on the previous M4A1. Inside the box, each of the 22 olive green styrene plastic sprues is separately bagged. Two sprues are in clear plastic, vinyl grommets, and rubber strips for the suspension, a small decal sheet, and a small PE brass fret are also included and separately bagged while the instructions are loose within the box. For this review sample, the box is of the original M4A1 Mid Production kit but Tasca has sent a photo of the correct box art. The instructions also are unusual in that extra sheets covering the changes and options for this variant are printed but one must refer to the complete instruction set from their previous M4A1 for the rest.
Photograph Key Top of page:
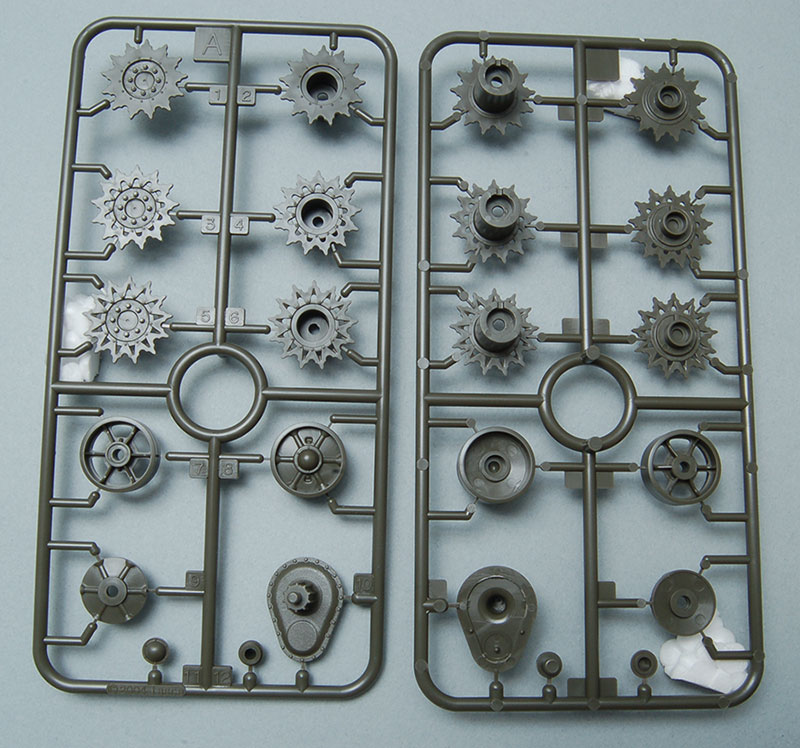
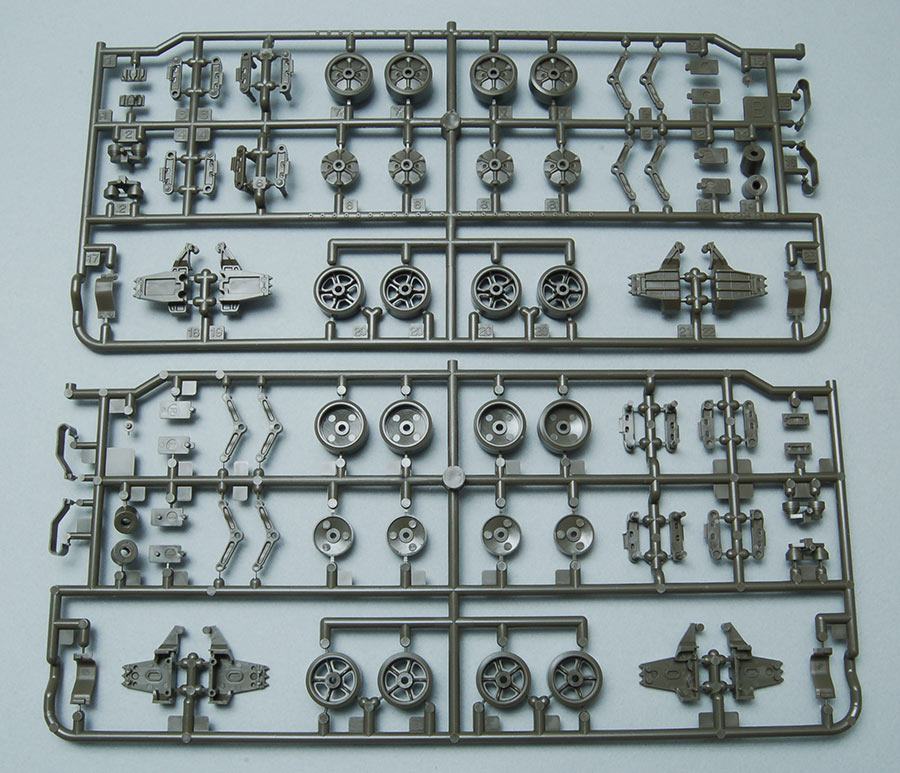
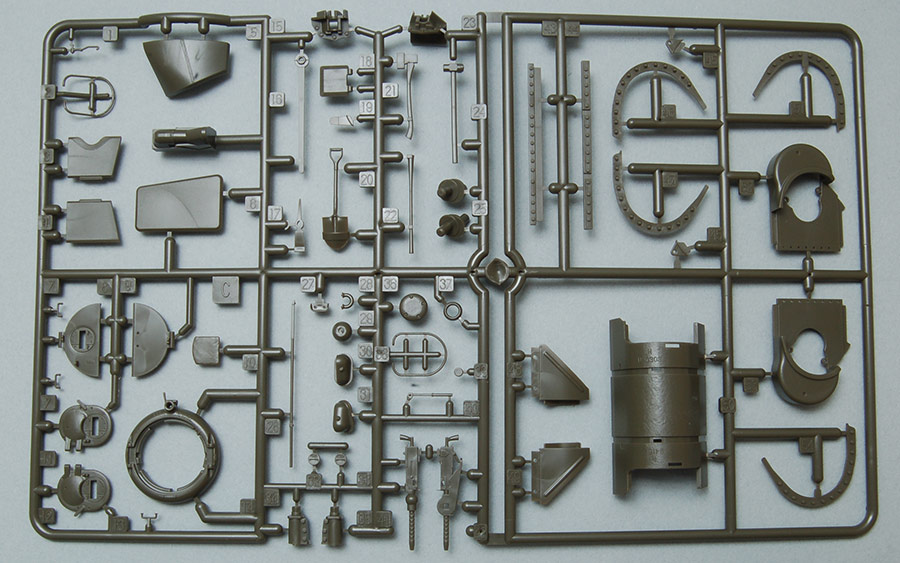
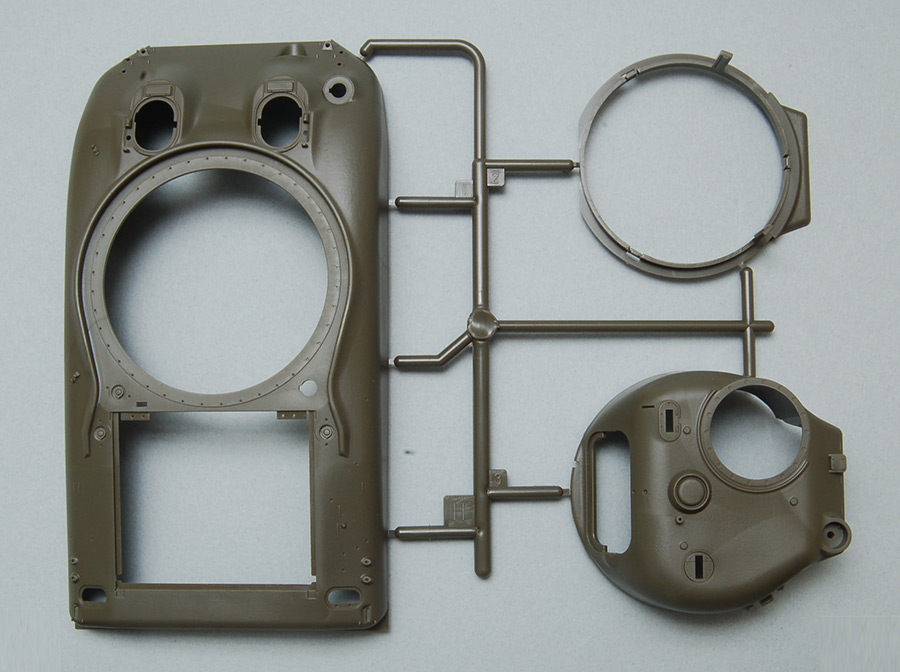
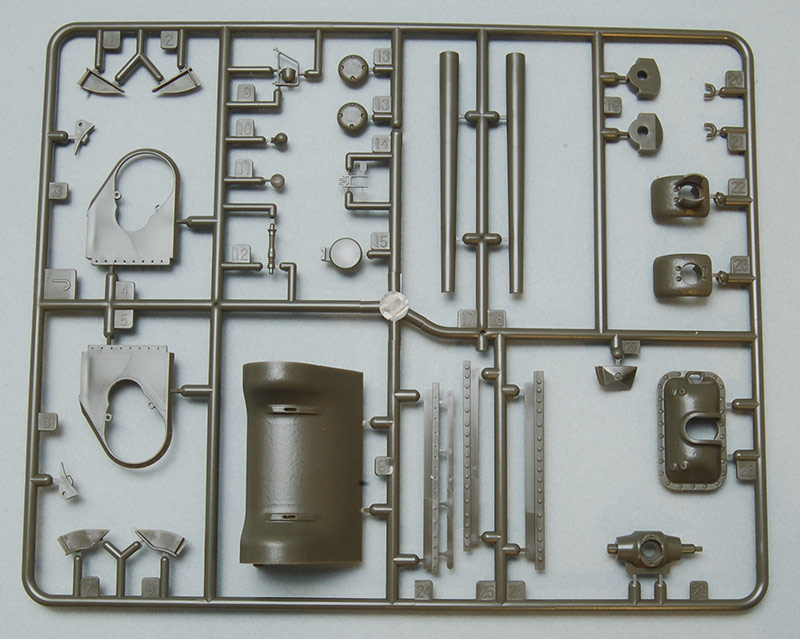
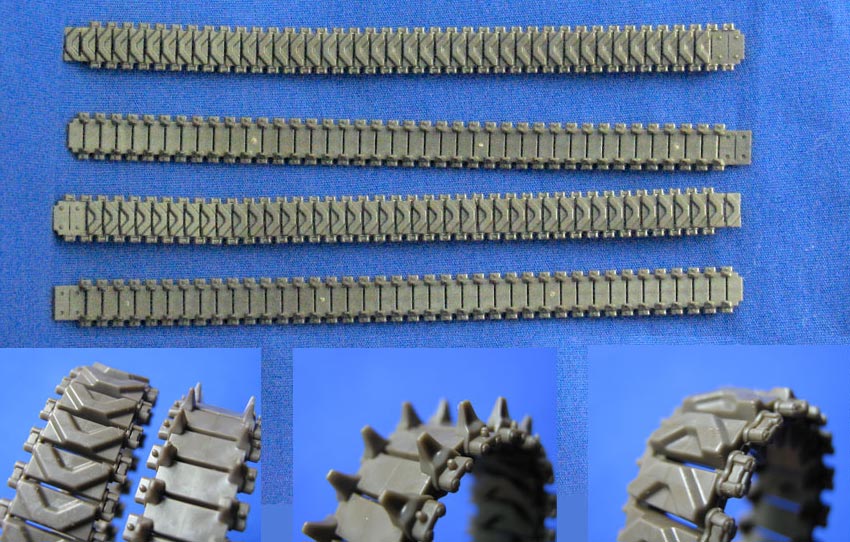
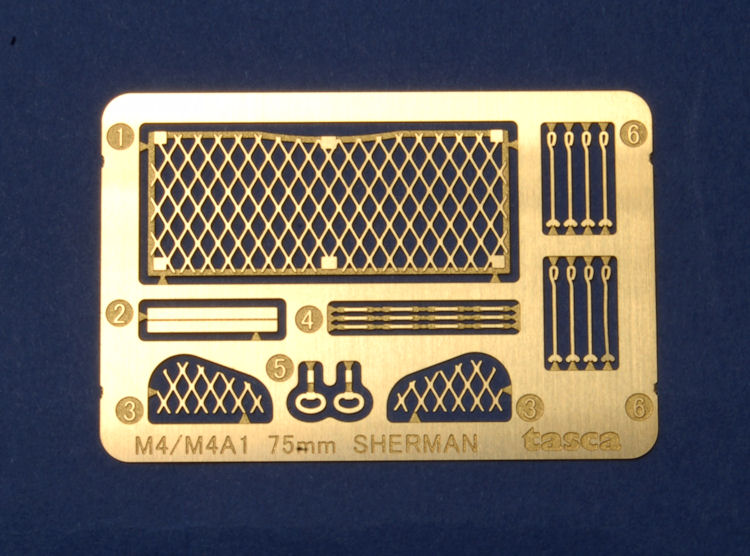
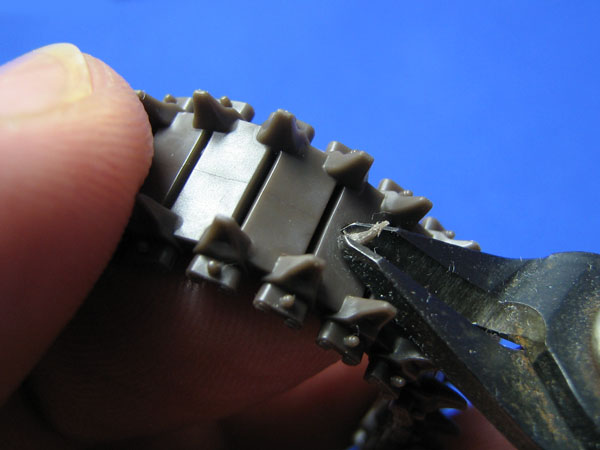
The model Running GearThe suspension trees from Tasca’s M4 Sherman VVSS Suspension Set A (Early) are included and these have been reviewed by Tim Streeter on this site (see appendix below). They are the best styrene plastic suspension and rival the resin aftermarket items produced. Using eleven pieces, the bogies are assembled and they remain semi-workable thanks to rubber strips used to replicate the volute spring action. Being a kit, the model may ride too high or low depending what items are used. For example, if I were to replace the gun barrel, a slight forward cant may appear. This would definitely be desirable if the variant were the Jumbo but not for the kit as is presented. Therefore, I will replace the rubber pads with Formations Models resin set that guarantees the correct suspension compression. Another item where I plan to use replacements is the road wheels and idlers. Even though they are beautifully detailed and come complete with inboard details, adding the dozen pop rivets to each road wheel is far too tedious. The idlers lack the proper cross sectional appearance and should look like ABM’s M3 Lee/Grant idler once assembled. HullThe upper hull is identical to the one included in the Mid Production kit, 35010. This means it is quite accurate in shape based on Ordnance drawings. As before, all fuel and oil ports are depicted with separate armored covers. For this kit, slight modifications are in order such as removing little stubs on the outer lower edges to allow sand shield mounts to be added. A scale side view assists in the placement as well as adding the appliqué armor. Drilling out the 1mm mounting holes for the siren bracket is also required. A coat of Mr. Surfacer 1000 which is swished around to create an uneven coating should help improve the cast texture while not overdoing it. The other late production details present in this kit include the later front mudguards and their mounts, the gun travel lock, and optional rear light brush guard styles. A nice touch by Tasca is the jig, part L23, used to help place the gun lock bracket mounts onto the glacis. Photo-etched screens are included for the armored air vent cowl and the growser storage covers. The lower hull is identical to the previous release and the instruction insert claims that removing the rivets is optional. A plan view of one side and the belly are included with shaded areas indicating which rivets to remove. I am not convinced that the transversal stiffeners should remain as I have seen stiffeners with more of a triangular cross section being used. Even though it is assembled from many flat pieces, which include sponson bottoms, the lower hull fit is exceptional. If building an M4A1 which is not from Pressed Steel, a curved section of styrene will be needed to modify the transition of the belly to the lower rear hull. The lower rear hull hatches are separately molded so the engine bay can be filled with an aftermarket Continental radial. The air cleaners get photo-etched hold down bolts but these appear too flat and I plan on replacing them with bent wire and a butterfly nut from ModelKasten. TurretThe slide molded turret remains unmodified from the Mid Production kit but one does drill out the 2 inch mortar tube port using a 1.5mm drill bit, and gun sight vane. All other new additions are merely glued on. As before, the turret is highly accurate in contours and will benefit from drilling out the drain holes from the ventilator surround and antenna pot armor. The same hatches from the Mid Production kit are present and these are beautifully detailed especially the commander’s with the included heavy machine gun. The spent shell port hatch can be positioned as one wishes to portray it. I would personally replace the SCR610 radio antenna mount with one from Armorscale. The same gun tube from the previous kit is included and I plan to replace mine with one from LionMarc Model Designs as both early and non tapered gun barrels have been seen on this variant. Optional rotor shields are included, one of which has the row of beautifully rendered screws while the second, later, type eliminates their exposure. Tie downs are provided in photo-etched brass but these are not very convincing given the quality of the rest of the kit. Wire, with suitably flattened ends, will be bent and added in the place of the brass parts. TracksThese are the Rubber Chevron T-48 tracks in a polystyrene and vinyl blend. This means that they can be assembled with any modeling cement. They consist of two runs for each side, reminiscent of Zvezda’s T-34 treatment. One is instructed to remove casting nubs but no indication of how to eliminate the small molds seams. Most of these could be carefully shaved away and a light brushing with modeling cement would eliminate the last traces of them.
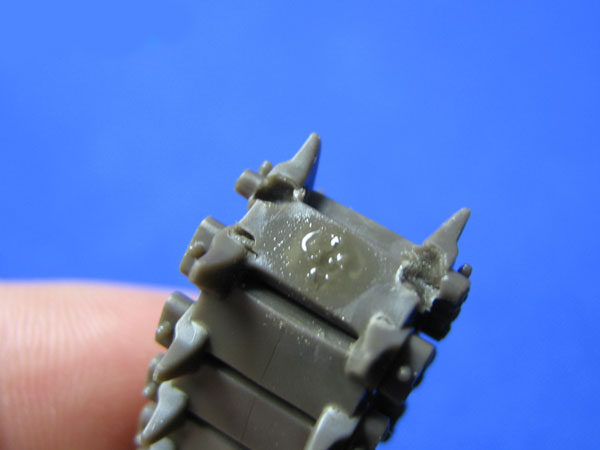
I used a scalpel and it still left a dimple. However, when I flexed the tracks in order to reach with the sanding stick, you can see where the end connector moldings are starting to tear. Using a hot glue, like Tenax 7, only made matters worse! Luckily, the same glue used on the joints while holding the tracks rigidly in place will repair them. Fortunately, the cement repaired the tears but I think it is a good idea to warn those that may panic if the track comes apart that is still can be fixed. Jim Wechsler
has offered this solution: "I've had some success by placing
the tracks on a flat, hard surface and pressing firmly before making
the snip. I ended up with a cut that was very close to flat and
thus I could avoid attempting to them up further. After painting
and weathering they all but dissappeared. The couple that I could
still see I placed under road wheels to hide." The medium used for these tracks is a proper one since Sherman tracks are ‘live’ in that they tend to curl inwards and do no exhibit the sag of ‘dead’ tracks. With the idler mounts loose, the proper tension can be added without causing the tracks to bow between the sprocket rings of the drive wheel. Of course, one can replace them with aftermarket individual links but I would not recommend Friulmodel as the metal medium is not really suited for this type of track. ModelKasten’s ultra complicated treatment does end up with live tracks which tend to curl but I am going with the ex-RHPS tracks recently released by Panda Plastics. Detail PartsLooking over the left over parts, there are many detail items that can find their way to other projects. Also, depending on the subject one is modeling, these parts may be useful. They include appliqué armor for the hoods (a photo exists of this field conversion), several types of bow gun cover mounting strips, the previously mentioned choices of roadwheels, idlers, track return skid plates, and drive sprockets wheels. From the machine gun sprue many items are left over which can be used for stowage on this kit. AccessoriesIncluded is one sprue from Tasca's WW2 U.S. Jerry can Set, two each of fuel and water cans. The Browning M2 Machine Gun Set B with Cradle is included too. There is a commander figure, in the box, wearing herringbone twill coveralls with a holster and ammunition clip pouch for the belt. The tanker’s helmet is represented and the pose is intended to be used in the turret hatch. I do wish the goggles were included as clear parts. MarkingsPainting and marking information are provided for four U.S. Army tanks: 1. Tank No.32,
D Company, 66 or 67th Armored Regiment, 2nd Armored Division, Normandy,
June 1944. The decals are printed by Cartograf and are very thin and opaque. Additional schemes and markings can be found by consulting the reference list provided. After-market Accessories 1. Formations:
Ride Height Spacers for Tasca Sherman Suspension (no.F086). These
replace the rubber pads in the Tasca kit. ConclusionsThis is definitely one of the best and most accurate kits made if built directly out of the box. It should be noted that the disjointed instructions are a bit confusing and care is needed to ensure the right details are used for the marking scheme chosen. There are plenty of small opportunities for enhancement and I am certain that new aftermarket products will come to provide alternatives for the roadwheels, idlers, mudguards, and markings. Other Tasca Reviews 1. Paul A.
Owen's review of the Tasca U.S.
Medium Tank M4A1 Sherman (Mid Production). References 1. British
and American Tanks In WWII, by Peter Chamberlain and Chris Ellis - Saul Garcia |


 |
 |
 |
 |
 |
 |
 |
 |
 |
 |
 |
 |
|