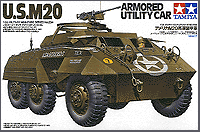
| U.S.
M20 Armored Utility Car |
 |
|
After Tamiya's release of the M8 armored car, it was natural that the M20 would appear. This low-silhouette vehicle was used in the reconnaissance and scout regiments. The M20 carried a more powerful radio than the M8 and had a map table, benches, and a small step-up for the MG gunner. It was fast, reliable and some commanders used it as their personal vehicle. Armament consisted of a .50 caliber M2 Browning MG, a bazooka anti-tank rocket launcher, three M1 carbines, and the small arms the crew carried. The
turret of the M8 kit has been replaced with a sprue providing all
the necessary parts to convert to M8 in to the M20: new front hatches,
new interior with bench seats, a bazooka, rifle rack, etc. The kit
includes a driver figure. If you have the M8 as well, there are
some 37mm rounds left over in this kit, so it's an excellent opportunity
to fill the rather empty racks in the M8 with six more rounds. Suspension The instructions tell you not to glue the wheels until after you have attached the upper hull; you may wish to paint the wheels and the car body separately and add the wheels at the very end of the project. The wheels assemble from five parts. The back pieces with separate brake drums fit inside the main wheel body, trapping the famous Tamiya poly caps and allowing the wheels to turn. Interior Step 10 focuses on the armored superstructure. Take care that everything aligns well. This assembly is attached to the hull in Step 11, which in turn is attached to the chassis together with the rear engine doors. The last step in the interior part is to add some rifles to the rack and you can take this opportunity to include some more stowage of your own. Exterior Driver's hatches are next as well as the brush guards for the head lights and here you could improve on the kit. The hatches fit fine when closed, but when you want them open to show some of the interior, they just don't fit. Try to catch some photos (perhaps at the AMPS website) to fix this. The last step is to fit the machine gun and ring and tow rope, which is made of nylon cord and two end loop pieces. If you've chosen the mine racks, you can add the mines. Painting The
markings are offer several options, including the 2nd Armored Division,
82 Armored Recon Battalion, C Co., 1st Platoon in France, August
1944; the 807th Tank Destroyer Battalion, B Co., 1st Platoon in
Germany, 1945 (with "Crunchin' Kitty" logos on the rear
fenders); and a very colorful M20 of the commander of 5th Armored
Division, 2nd Dragon Regiment of the Free French Army in France,
August 1944. Conclusion - Martin Dogger - |
 |
 |
 |
 |
 |
 |
 |
 |
 |
 |
 |
 |
|