| Building
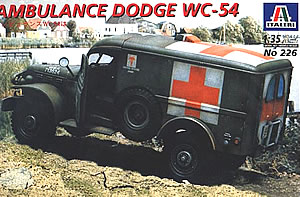
Italeri's Dodge Ambulance |
 |
|
Back in the "Stone Age" of AFV modeling (1970s - 1980s) Peerless Max created a series of military models based on the Dodge T214 ¾ ton 4x4 chassis. Italeri later acquired the molds for the Dodge WC-56 Command Car, Dodge WC-52 "Beep" (for "Big Jeep"), the Dodge M6 37mm armed tank destroyer, and the WC-54 ambulance. This is a kit I bought on whimsy and it sat on the shelf for several years. Coming up with an idea of how to put it to use led to my Hürtgen Forest diorama. I came across a driver designed for kit by YANKS, and several companies came out with chained wheels for the Dodge kits. When Verlinden came out with a MASH Jeep Conversion, it seemed the modeling gods were sending me a very strong signal. The Italeri kit is fairly simple kit to build, but mentally it's quite complex. You need to think through the entire construction process to determine where and when you must mask, paint, or delay installing parts. It's crucial to decide, before construction begins, if you are going to have any doors opened, since you'll need to paint and weather the interior sides before added the roof pieces. Choosing this option in midcourse will undoubtedly complicate your life. While I did not take a micrometer to the parts, the kit seems to be correctly scaled and is a good representation of the GI lifesaver. Assembly of the model begins with the many parts that comprise the chassis. If you've been spoiled by Tamiya's recent simplified chassis assemblies you may be put off by the seemingly unnecessary complexity of this task. Reference photos show the bumper guards 7 and 8 as positioned upside down, opposite the kit's instructions. If you install them as directed, they will interfere with building the rear step in the down position.
Step 5 consists of attaching the stretcher hangers and bench seats to the inner walls. If you are going to keep the back door closed you do not need to do any more to this area. If you want the doors open, then you may wish to texture the padded benches and thin the stretcher hangers.
At step 7 you glue the inner roof to the hood/windshield/cab roof part 43, as well as the steering wheel and dashboard. Before proceeding, it's good to dry fit the clear plastic windshield. There may be a gap between the window and in the bottom corners that you'll need to fill in with some contour putty. You also need to paint the interior sides of these pieces. You may wish to paint the exterior or be prepared to mask the windshield area. Paint the knobs and gauge faces black, and add white demarcations to the gauges if you've got a fine-tipped brush and a steady hand. The small rectangles on the dashboard surface are notification plates. Paint them black, and make a few ticks in white to symbolize the writing.
Also, carefully paint the surrounding raised weather-stripping on the clear plastic windows a medium black or rubber color. Note that this side is on the exterior of the doors. It's easy to assume from the bevel of the clear plastic that the flat, featureless side is on the outside. You may have some gaps to fill with some Testors contour putty. I'd recommend dry fitting and then gluing the hood/windshield/cab roof to the lower cab section walls before adding the doors, so that you can make sure those arches over the doors mate with the windshield sides. You may end up with a gap where the two sections meet near the door. There should be a visible seam here, but not a chasm. Fill with putty and run your X-acto along it to preserve the seam.
The grill and headlight guard piece suffers from the mold's inability to produce round bars. Consequently the bars are triangular, and you need to whittle down the backside with a sharp X-acto blade, fiddle with a photoetched substitute, or live with it. I opted for the sharp X-acto, and got satisfactory results. I painted the grill separately and installed it after painting the radiator black. I carefully drilled out the solid headlamps and added #21 MV lenses but did not add the headlights to the fenders until after the body was painted. The windshield wipers were added later after the windshield was installed. I usually glue side mirrors as late as possible so I don't snap them off. The kit's mirror has a horribly raised ejector mark on the mirror face. The part is thin and I didn't think it would withstand grinding. Instead I applied several layers of thick ModelMasters Chrome paint. That builds up around and softens the raised circle quite well. In step 10 I replaced the kit's anemic tools with some from Academy's equipment set and added straps and buckles. I added new handles to both sides of the rear doors. The kit has decals for the 91st Infantry and the 82nd Airborne Divisions. The large Red Cross markings on the sides, rear and roof for the 91st are the most familiar. The big problem with this roof decal is that it does not take into account the raised air intake. You will have to take your sharp blade and do some surgery then try to match it with red paint. I opted for the alternate design with a different unit designation. I highly recommend giving the model a good gloss overcoat before applying the decals, and trim them very closely. Eduard makes several different Dodge photoetch sets, but none specifically for the WC-54. The parts to create a new grill demand a great deal of patience, as you need to cut plastic rod very precisely to fit within the brass framework. The brass pieces for the headlight guards are also challenging. Spare fuel cans were often added to the aft side of the fenders; consider the tray and strap set from Accurate Armor (A35). I also added Tank Workshop's chained wheels (#0064); drill out the backsides of the wheels or nip off the nub on the Italeri axles in order to get them to sit properly. I used items from of Verlinden's MASH Jeep Conversion set (1283) to outfit my ambulance.
This kit goes in and out of production regularly. You can be fairly assured that when its on the shelves you'll be preoccupied with the big tracked beasts, and when you do get inspired to build one you won't be able to find it. References: Standard Catalogue of U.S. Military Vehicles, Thomas Berndt, Krause Publications, Iola, WI, 1993, ISBN: 0-87341-223-0. U.S.
Army Vehicles of World War II, J.M. Boniface and J.G. Jeudy,
Haynes Publishing Group, Somerset, England. 1991, ISBN: 0-85429-811-8.
-tss-
|
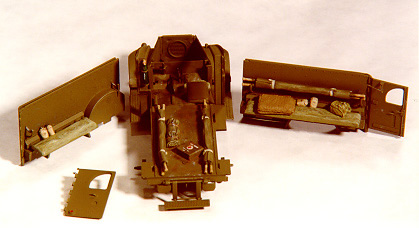 In
step 4 you assemble the seats and control levers for the cab and
then enclose them with the cab sides. The sides include the section
that partially surrounds the doors, and must mate with the single
piece that comprises the hood, windshield and roof. Spend some time
dry-fitting this assembly before gluing. You'll see that the arch
of the side pieces 31 and 33 may not mesh well with the roof part
44. To help solve this problem, bend the arches upward.
In
step 4 you assemble the seats and control levers for the cab and
then enclose them with the cab sides. The sides include the section
that partially surrounds the doors, and must mate with the single
piece that comprises the hood, windshield and roof. Spend some time
dry-fitting this assembly before gluing. You'll see that the arch
of the side pieces 31 and 33 may not mesh well with the roof part
44. To help solve this problem, bend the arches upward. 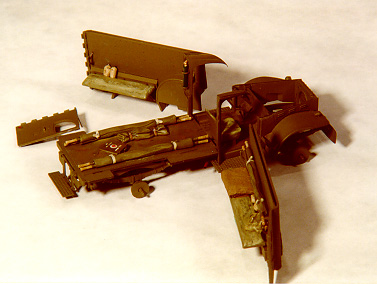 The
next step installs these inner walls onto the rear bed, topped off
by the interior roof. Again, if you are going to have the rear doors
open, you'll need to paint the insides of the pieces before gluing
them in place.
The
next step installs these inner walls onto the rear bed, topped off
by the interior roof. Again, if you are going to have the rear doors
open, you'll need to paint the insides of the pieces before gluing
them in place.  Now
come the doors. If you haven't noticed it by now, from the numerous
photos on the box, you will be shocked to find that there are no
handles for opening the cab doors. Use 1.5mm plastic card and carve
a couple handles, a bit larger where they connect to the door, and
then rounded and tapered to the ends. While you're at it, you may
wish to replace the interior molded-on handles if you will have
these doors open. Unless you're adept at masking irregularly shaped
parts, both sides of the doors should be painted before adding the
windows.
Now
come the doors. If you haven't noticed it by now, from the numerous
photos on the box, you will be shocked to find that there are no
handles for opening the cab doors. Use 1.5mm plastic card and carve
a couple handles, a bit larger where they connect to the door, and
then rounded and tapered to the ends. While you're at it, you may
wish to replace the interior molded-on handles if you will have
these doors open. Unless you're adept at masking irregularly shaped
parts, both sides of the doors should be painted before adding the
windows. 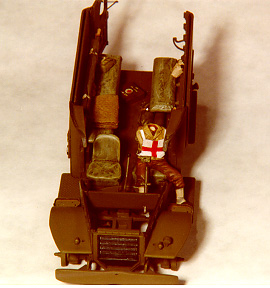 Step
8 begins to bring the subassemblies together. The rear outer walls
and roof, wheels and running boards are added. Step 9 focuses on
the front end of the cab. I strayed from the instructions and only
added the fenders and parts 72 and 73 before painting this area.
Step
8 begins to bring the subassemblies together. The rear outer walls
and roof, wheels and running boards are added. Step 9 focuses on
the front end of the cab. I strayed from the instructions and only
added the fenders and parts 72 and 73 before painting this area.
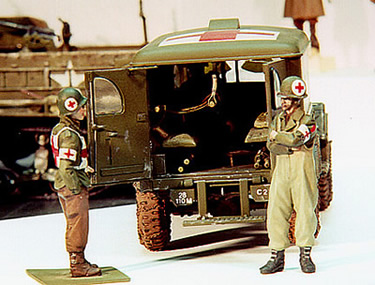 This
kit and Italeri's Jeep ambulance were victimized by the lack of
U.S. or allied medics or wounded soldiers. Verlinden Productions
and Yanks both offer pairs of wounded and medic figures. I added
an acceptable ambulance driver from Yanks (#9631), but had problems
getting the figure's arm to reach the angled steering wheel. I used
a bit of plastic rod to bridge the gap and installed him in the
cab before adding the roof.
This
kit and Italeri's Jeep ambulance were victimized by the lack of
U.S. or allied medics or wounded soldiers. Verlinden Productions
and Yanks both offer pairs of wounded and medic figures. I added
an acceptable ambulance driver from Yanks (#9631), but had problems
getting the figure's arm to reach the angled steering wheel. I used
a bit of plastic rod to bridge the gap and installed him in the
cab before adding the roof.  |
 |
 |
 |
 |
 |
 |
 |
 |
 |
 |
 |
|