|
Model
and Article by Hervé Charbonneau
Hull
Interior
Because
I decided early on that I would build the model with hull hatches
closed, and because little of the hull interior would be seen through
the small and crowded turret, I did not make any changes in this
area of the kit.
 Hull
Exterior Hull
Exterior
-
Rebuilt the outer rim of the idler wheels using pieces of plastic
runner (sprue) stretched over a candle.
- Removed
the inner lip from the outer face (teethed plate) of the drive
sprockets.
- Added
the strengthening bars that run from the hub of the rearmost suspension
arms (point where they attach to the hull) to a point just under
the sponsons, slightly in front of the idler wheels.
- Filled
in the gap between the front ends of the upper and lower hulls
with a piece of Evergreen plastic strip.
- Added
a length of Evergreen strip with two bolt heads, at a slight angle
from vertical, on either side of the lower hull, just in front
of the sprockets (see reference pictures).
 Added
missing weld seams using thinly rolled pieces of two-parts putty
set into grooves made with a dental bur where the upper hull sides
meet with the sides of the glacis plate, across the front end
of the hull just in front of the headlights, and also across the
bolted transmission access plate. Added
missing weld seams using thinly rolled pieces of two-parts putty
set into grooves made with a dental bur where the upper hull sides
meet with the sides of the glacis plate, across the front end
of the hull just in front of the headlights, and also across the
bolted transmission access plate.- Removed
the kit's front fenders and replaced it with fender stubs (fenders
without the front and side flange) made from thin plastic stock.
- Added/replaced
hull tie-downs with homemade tie-downs made from pieces of stretched
sprue.
- Replaced
the kit's stowed .50 cal MG tripod with one from a Tamiya kit
and scratchbuilt a retaining arch and fastener for it using thin
strips of plastic.
- Used
PVC tape from which I removed the adhesive using solvent to make
retaining straps for the pioneer tools, and thin copper wire to
make assorted buckles.
- Replaced
the kit-supplied "T" shaped tow shackles with "U"
shaped ones from the spares box.
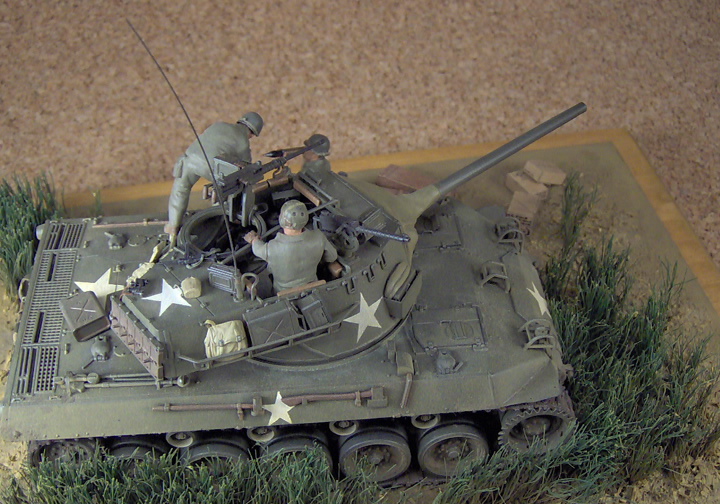
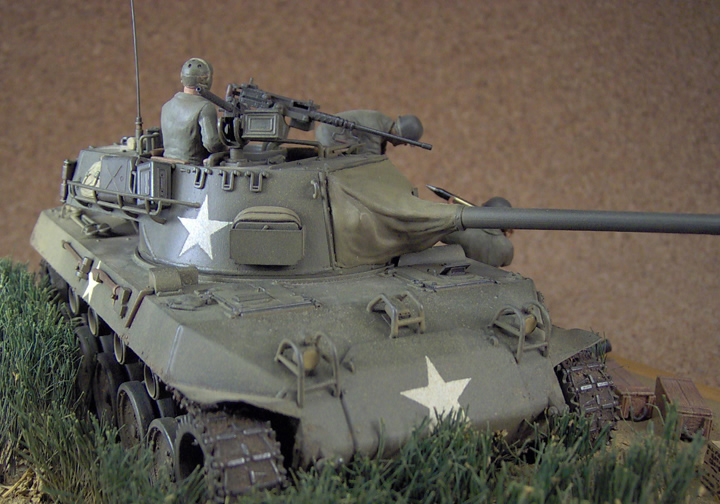
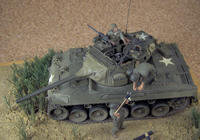
 Turret
Interior Turret
Interior
-
Replaced the kit's incorrect gun barrel with a shortened barrel
from a T-34/85 kit (not 100% accurate, but it looks alright).
- Scratchbuilt
the missing gun sight based on pictures from the AFV Interiors
website (unfortunately now offline).
- Added
missing features such as grenade box (from the spares), binocular
holder (scratch) and gunner's quadrant holder (scratch) on the
left inner turret wall.
- Replaced
the kit's SCR-610 radio with one from Tamiya's old "US Gun
& Mortar Team" set. Though not the most accurate and
detailed radio around, it is a vast improvement over the kit's
overly simplified part.
- Added
some wiring on the turret traverse controls and around the base
of the turret.
- Added
a "façade" of .50 cal ammo boxes to the empty
MG ammo lockers in front of the loader's position (this was cut
from a .50 cal ammo locker taken from a Tamiya Dragon Wagon kit).
- Added
a few rounds from AFV Club's incorrectly labeled "3in. &
76mm Ammo" set in the ready ammo rack in front of the loader's
position (despite what the name says, these cannot be used as
3 inch rounds).
- Added
crash pads, made from two-part putty, along the upper edge of
the turret walls.
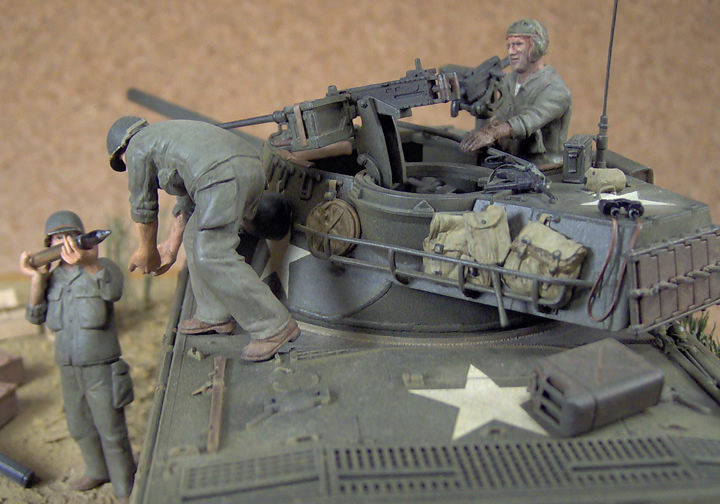
Turret
Exterior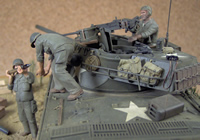
- Added
missing weld seams using thinly rolled pieces of two-part putty
along the bottom of the turret, along the joint between the turret
sides and the vertical section under the turret bustle, and at
the point where the turret counterweight attaches to the rear
wall of the turret bustle stowage section.
- Scribed
a vertical line on the sides of the turret bustle in line with
the edge of the hatch of the stowage compartment.
- Added
missing tie-downs along the upper edge of the turret sides.
- Added
small mounting plates with bolt heads at the point where the two
rearmost "legs" of the external stowage baskets attach
to the turret walls (the basket was welded to the main body of
the turret, but bolted to the bustle stowage compartment).
- Replaced
the kit's fragile antenna guard (mine snapped when I tried to
cut it off the runner) with one made from aluminum wire.
- Replaced
the molded-on handle on the hatch of the rear bustle stowage chest
with one made from copper wire.
- Thinned
down the holders for the foul weather hoods by running an X-Acto
blade edgewise along the inner face.
- Replicated
the canvas portion of the foul weather hoods with two-part putty.
- Made
a dust cover for the main gun mantle with two-part epoxy putty
applied in layers.
- Replaced
the ammo box for the kit's .50 cal MG with a Tamiya box enhanced
with pieces of thin plastic stock, stretched sprue, PVC tape and
a short length of belted rounds from another kit.
- Added
a .30 cal MG from Academy's M12 kit in front of the loader's position,
as commonly seen on Pacific Theatre vehicles.
Additional
Notes
 1.
Tracks 1.
Tracks
The
kit-supplied tracks are OK, even if on the thin side. I guess most
AMS-struck modelers would rather use individual link replacements,
but I used the kit's tracks and am quite satisfied with the results
(they're glue-able and take paint pretty well).
2.
Lower hull and suspension
- A
lot of care should be taken when attaching the sprocket and idler
mounts. Be sure to attach (temporarily) the frontmost and rearmost
road wheels before doing so to get the proper angle/space between
the latter and the sprocket/idlers.
- AFV
Club have placed the return roller mounts too high up. They should
be removed and lowered a couple of millimeters (I decided to leave
them where they are).
- The
kit lacks the strengthening bar that extends from the hub of the
rearmost suspension swing arm to somewhere just underneath the
hull sponson, just in front of the idler wheel.
 3.
Road wheels, sprockets, and idlers 3.
Road wheels, sprockets, and idlers
- The
kit's road wheels are a bit too shallow. You can either replace
them with resin replacements or use them as they are and live
with that (I chose the latter option).
- The
sprockets are of a reinforced type that I have not yet seen on
WWII pictures. To turn them into the correct style, you must shave
off the inner lip of the sprocket's outer/teethed plate so that
it is flush with the inner wall of the sprocket wheel.
- The
idlers are among the worst parts of the kit. The main problem
lies with the outer face/rim of the wheels, which are grossly
misrepresented. The best option there is to just replace them
with aftermarket items. I took a different route, i.e. I shaved
off the incorrect and improperly molded inner lip of the idler's
outer rim and glued a piece of stretched runners all around the
outer edge of the those same outer rim. I then filled in the groove
between the piece of stretched runners and the kit's parts with
dissolved plastic (a.k.a. goop) and sanded the outer perimeter
smooth. The result is not 100% accurate, but it does look more
like the real thing.
4.
Upper hull
- The
main problems with the upper hull lie in the lack of weld seams
and the fit of the front part where the front ends of the lower
and upper hulls meet. I filled a millimeter wide gap there with
a piece of Evergreen plastic strip.
- It
should also be noted that AFV Club provides a very, very basic
interior for the hull made up of very simplified driver and co-driver
seats, an equally simplified transmission, a floor and rear bulkhead
for the fighting compartment, and sponson-mounted ammo racks.
I did not add anything there as I decided to build my model with
the hull hatches closed.
 5.
Turret interior 5.
Turret interior
- The
turret is certainly the part of the kit that requires the most
work, starting with the very visible interior for which AFV Club
provided only very basic details.
- The
first thing I did was to replace the featureless SCR-610 radio
with an old Tamiya equivalent (from Tamiya's old US Gun &
Mortar Team set). That may not be the most accurate and detailed
radio around, but it is still a vast improvement over the kit
part.
- Another
big issue with the turret interior is the ready ammo locker located
in front of the loader's position. The real thing had holders
for ready 76mm rounds as well as for .50 cal ammo boxes. AFV Club
left the spaces for the .50 cal ammo boxes empty, and made the
walls of these lockers too thick, which makes it impossible to
fit ammo boxes in there. So I stole a .50 ammo locker from a Tamiya
Dragon Wagon kit and proceeded to saw of the front end, which
I then trimmed to have the correct number of ammo boxes and, after
thinning it down, glued over the empty MG ammo lockers.
 Finish Finish
All
sub-assemblies were primed with Tamiya X-18 Semi-gloss Black and
painted with XF-62 Olive Drab. Allied stars are from the now defunct
Ordnance Depot. Paint and decals were sealed with Testors Dullcoat,
and weathering included an overspray with Tamiya Buff and the application
of a mixture of sifted, water and white glue on the lower parts.
Ground lead pencil was rubbed on selected surfaces for a worn metal
that adds weight to the whole.
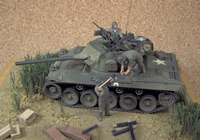
Conclusion
I realize
that the AFV Club kit isn't 100% accurate, but without actually
measuring it, I find that its general outlines look much closer
to the real thing than Academy's. Hence I believe that for an equal
amount of work, it can be made into a better representation of this
compact, sleek looking little AFV.
Note
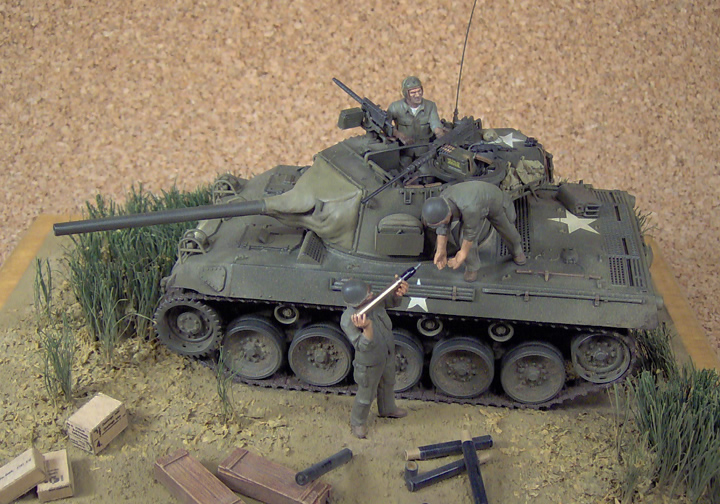
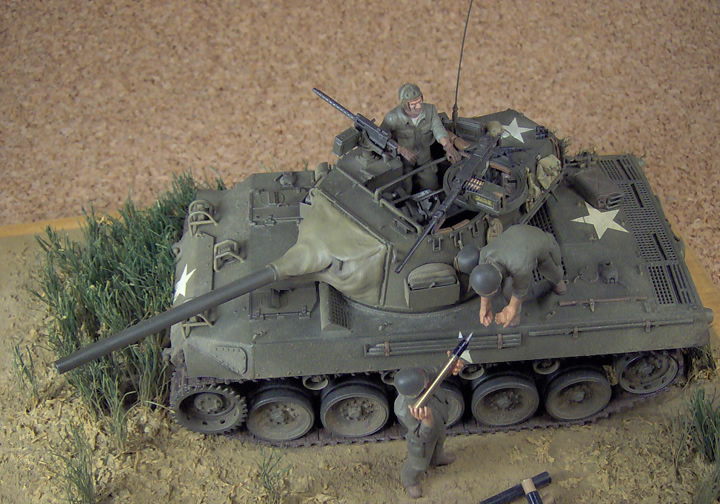
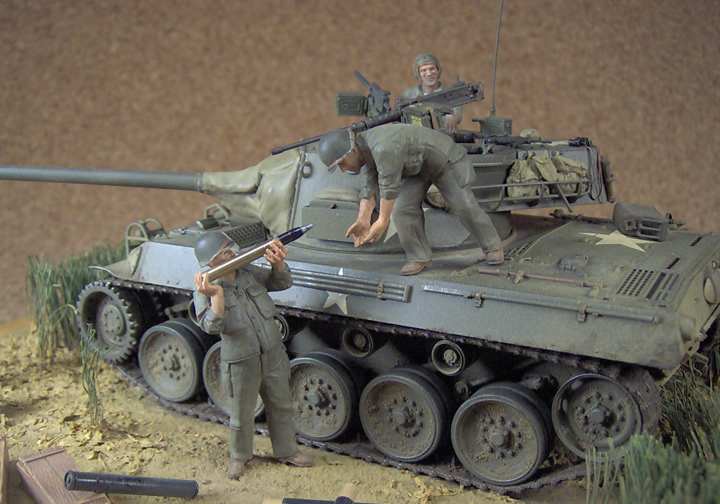
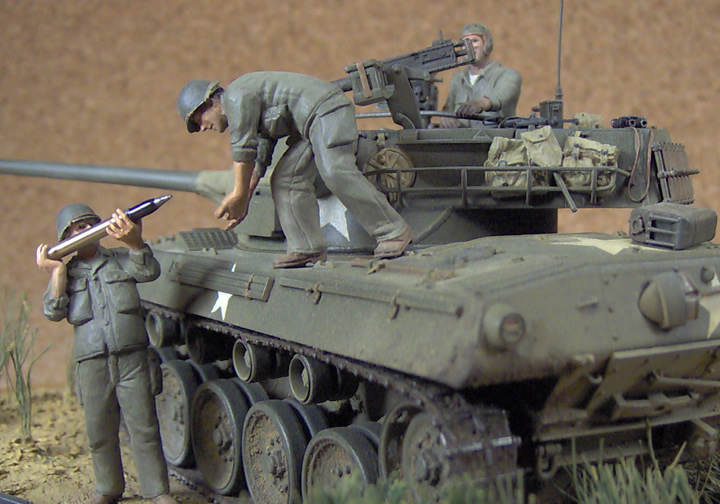
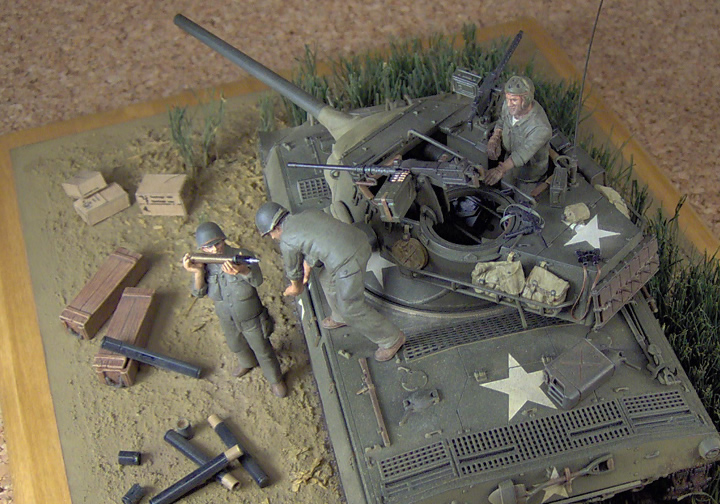
on the Diorama
I tried
to depict a vehicle from the 306th AT company attached to the 77th
Infantry Division on Okinawa, as seen in the last pages of Concord's
U.S. Tank Destroyers in Combat. I know this may not be the
most "glamorous" setting for the vehicle, but I didn't
want to cover up the model with the kind of excessive stowage more
characteristic of vehicles in the ETO. Markings on these also appear
to have been minimal, i.e., standard Allied stars, even though I
could not find pictures showing the front end to verifiy the presence
of other markings.
The
figures are from Tamiya's "German Tank Crew Loading Ammunition"
set. Those are great for converting into U.S. troops because of
the loose trousers and absence of elaborate equipment. I simply
scraped off their belts and used two-part putty to add the lower
part of the fatigue shirts and the pockets. I also used a sharp
X-Acto blade to carve the seams on the shirt and trousers, and to
enhance the detail of the shoes. The heads and helmets are also
Tamiya parts. The helmets are from the "U.S. MP & Harley"
se,t as I find that their outline is the most accurate. The chin
straps were made from black PVC (electrical) tape from which I removed
the adhesive. The same material was used to make the straps on the
field bags, the binoculars and the M3 "Grease Gun." The
guy standing in the turret is from Tamiya's M60 kit, with arms from
an Academy set, and received the same treatment as the other two.
The
base is the part I'm not too satisfied with. I used plaster of Paris
to make the basic groundwork, and added a mixture of fine dirt,
water and white glue to texture it up a little. I also sprinkled
parsley around the base of the long grass which I made from pieces
of twine painted green. The base itself is a precut board I found
in the arts and craft department of the local Wal-Mart. It was treated
with water-based varnish.
|